
If you have ever attended one of my conference sessions, read my articles, or hired me to perform any kind of MQ work, then you know that I consider SupportPac MS0P to be an indispensable add-on for MQ Explorer. I recommend it to everybody. The folks at Hursley Lab are probably sick by now of my stirring up crowds at the conference by insisting it should be part of the base functionality in Explorer and fully supported. Given all that, you’d think I personally would have it installed in the MQ Explorer on my laptop. Until tonight, you would have been wrong.
Tonight I dropped everything else and concentrated on getting MS0P to run. I was eventually successful, but learned a lot about MQ along the way. I’m writing it all down to hopefully save others from the same ordeal.
If I asked the entire readership of this blog to name one piece of software I’m most likely to have installed on my laptop, both of you would probably say “MQ.” (OK, I may be overestimating my audience, and the answer would probably actually be “cracking software” or “porn” but play along.) Not only is MQ on the laptop, it’s probably the only piece of software that’s been installed since the day I unboxed it. The sequence of events was first ever boot of the laptop, run the initial configuration and set up my user account, install MQ, celebrate.
Since that initial v7.0 install, I’ve applied several Fix Packs, upgraded to v7.5, applied more Fix Packs, upgraded to v8.0, and applied two more Fix Packs. When the C: drive filled up, I uninstalled and then reinstalled onto the D: drive. Somewhere along the way, MS0P stopped working. As you can imagine, this bugged me to no end. I do not know what my clients would think if they knew I didn’t have MS0P installed but it can’t be good. It either hurts my credibility or that of MS0P. Tonight I really needed to parse some event messages and could not take it any longer.
I will spare you the gory details and cut to the chase. About 3 hours and several reboots into the ordeal there had been no progress. With nothing left to lose but my sanity, I decided to totally uninstall MQ and start over with a fresh copy of MQ v8.0 Advanced For Developers (which is free, by the way).
My first real breakthrough was when I noticed that the installer never offered me an option to select a location for the MQ Data directory but continued to locate it on the C drive. This led me to review the MQ Explorer log file from the prior attempt and it also referenced a “missing repository” for the MS0P plug-in over on the C: drive. At this point none of my MQ configurations were supposed to be pointing at the C: drive, yet the installer and MQ Explorer both wanted to go there.
I cancelled the installer and scoured my laptop looking for stray configurations. Even though MQ now holds almost nothing in the registry, my registry was chock full of MQ entries. Presumably, these were left over from prior installs but the question was whether they interfered with my current install. Certainly something was.
So, once again, I backed out all traces of MQ but this time I deleted all the disk files. I had accumulated leftover directories on C: and on D: and in both “Program Files” and “Program Files (x86)” and wanted to be sure none of these were influencing the installer. I also deleted all the registry keys I could find pertaining to MQ. It seems unlikely that Microsoft will have pre-loaded any MQ registry keys so with MQ uninstalled I was cautiously optimistic about removing them. (I backed the registry up first and if you plan to edit yours, so should you!)
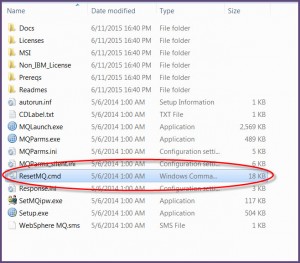
ResetMQ.cmd? What could that be?
It’s been a while since I took a close look at the MQ installer on Windows so before running through it again, I searched for any MSIEXEC configurations or other parms that might influence the installer. It was here that I ran into an inconspicuous file named ResetMQ.cmd. If you plug that value into the Knowledge Center, no hits are returned. Similarly, plug it into a Google Search and nothing relevant to MQ is returned. So I opened it up in Notepad++ for a peek under the hood. Here is what I found in the comments:
rem 1. Checks for existing installations... aborts if any found
rem 2. Checks for existing queue managers... aborts if any found
rem      unless LOSEDATA provided on command line
rem 3. Removes all the MQ related registry trees
rem 4. Removes files that previous installations may have left behind
rem      which will affect future installs
Wait, what? Instead of manually deleting registry entries, I can just use this? And it finds all the other files too? Sweet! I ran it. It found several registry entries I missed with my manual search. Awesome!
Right after running ResetMQ.cmd I rebooted. Always (and I don’t use superlatives lightly) reboot the host immediately before and after installing MQ and/or a Fix Pack. The first reboot saves the registry so that if the install fails you can revert back to it. In a server environment it is also possible that someone installed something before you and didn’t reboot. That means the saved registry contains the entries from before their installation and any problems with the MQ install potentially break their install as well. The reboot after your install is to protect you from the same issue. there aren’t many issues I consider to be showstopper during an implementation but this is one of them. If for some reason you cannot reboot your windows server before and after the MQ install, postpone until you can.
After deleting all my MQ directories, running ResetMQ.cmd, and rebooting, I finally installed MQ v8.0. The first indication of success was that it now offered to put the MQ data into C:\Program Data\IBM\MQ whereas before it wanted to put it into the Program Files directory on C: which I assume to be an artifact from prior installations. It finally looked like I was truly getting a clean install.
In fact, I was so confident that I immediately installed Fix Pack 8.0.0.2 without an intervening reboot, then unzipped MS0P into the MQ Explorer Dropins directory. With the installs in place I rebooted and then immediately fired up MQ Explorer. I anxiously waited through the splash screen and held my breath. Finally, at the bottom of the navigation pane, a folder named “Administered Servers” greeted me. MS0P was finally installed and running.

Success!
I stopped to write this blog post but believe me, as soon as I hit [Submit] there will be some serious celebrating going on at Casa de Wyatt tonight. If you want a clean install of MQ on your laptop or server, here are the steps to follow:
- Reboot.
- Shut down all MQ processes and services.
- Uninstall MQ.
- Delete any directories where MQ had previously been installed. (After backing up, if you think you might need to get them back, of course.)
- Open a Command window using Run As Administrator.
- Run the ResetMQ.cmd file from the V8.0 installer directory. Let it delete the MQ registry entries.
- Reboot.
- Install MQ.
- Reboot.
- Install the latest Fix Pack.
- Reboot.
- Verify that the installer correctly set the installation as primary using the dspmqinst command.
- Download MS0P and unzip it into the MQ Explorer dropins directory.
- Start MQ Explorer and look for MS0P’s Administered Servers folder.
- Check this off of your Spring Cleaning to-do list and celebrate. You’ve earned it.
I found that in a corporate environment it required a full search for ‘IBM and ‘MQ’ on every mapped drive to really get rid of everything. And a lot of rebooting.
Excellent news…. I have 20+ Windows 2008 servers to move from 7.0 or 7.1 to v8.0.0.2. Can hardly wait.
Pingback: MQGem Monthly (June 2015) | MQGem Software